
How to Redo Kitchen Cabinets on a Budget
Updating your kitchen cabinets is a cheap way to make your kitchen look fabulous without spending lots of money. Replacing kitchen cabinets can cost thousands of dollars and oftentimes that’s just not needed.
This post contains affiliate links. Please read our full disclosure here.
If your kitchen cabinets are old, ugly and damaged, you don’t always need to replace them. In this article, we’ll show you how to redo kitchen cabinets on a budget and make your old cabinets look brand new. When you’re done, you can spend the money you’ve saved on a vacation!
Read on for some of the best ways to update your old kitchen cabinets…
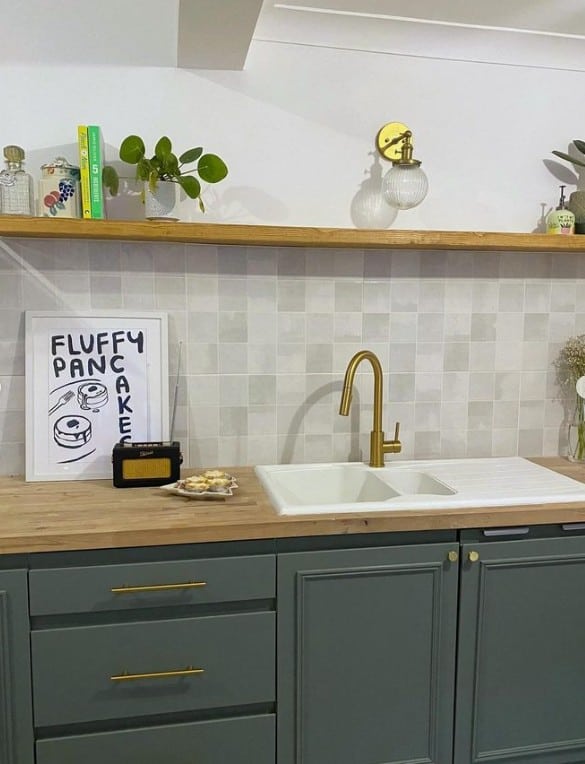
Paint your kitchen cabinets
One of the simplest ways to give your old kitchen cabinets a makeover is to paint them. Whether you have solid golden oak cabinets that were installed in the 90s or cheap and plain builder-grade plywood veneer cabinets, a lick of paint can work wonders.
Choosing your paint
Choosing a quality cabinet paint is important. Don’t be tempted to skimp and go for a cheaper all-round paint. Kitchen cabinets have to be able to withstand knocks and scrapes as well as splashes of water and grease.
Gloss or semi-gloss paint is a good choice for kitchen cabinets as it tends to be more durable than matte paint. Look out for paints which are labelled as ‘washable’ or that are specially made for the kitchen.
Grey is a very fashionable color at the moment, but that doesn’t mean that you need to go the whole hog with it. How about painting your lower cabinets grey and your upper cabinets white? Or perhaps dark grey walls and light grey cabinets would be to your taste?
Whatever color you choose, make sure you get samples ahead of time to make sure you love them!
Samplize offers peel and stick samples (no wet paint and brushes just for a small sample!) that are shipped right to your door.
Check out their website HERE.
To paint your kitchen cabinets, you will need:
- Screwdriver
- Soap and water or TSP (TSP gets grease off like nothing else but please look into using it beforehand- you’ll need gloves)
- Sponge
- Sanding block
- Primer-sealer
- Water and grease resistant paint
- Paint rollers
- Paintbrushes
- Brush cleaner
Step-by-step guide to painting your kitchen cabinets:
- Remove the handles or knobs – Place all the hardware and screws into a clear bag. There’s no need to remove the doors, but you can if you find it easier.
- Clean the surfaces – Wash the cabinets in soapy water to remove any grease or cooking splatter.
- Sand the surfaces – Removing existing paint isn’t necessary, you just want to roughen the surface to help the fresh paint stick.
- Apply a primer-sealer – Paint on this base coat to ensure that your new paint sticks properly and doesn’t flake off.
- Apply the first coat of paint – Using a very light coverage will show fewer brush strokes or roller marks and allow the paint to dry faster.
- Let it dry and then sand – Let the paint dry for at least four hours and then sand lightly.
- Apply the second coat of paint – For most cabinets, two coats will be enough. If it’s not, let it dry, sand again and apply a third coat.
Tip: Use a roller rather than a paintbrush for a smoother finish.
How to Update Kitchen Cabinets without Painting
If painting your kitchen cabinets seems like too much work, or you live in a rental house and want a semi-permanent change, then then you could cover the cabinet doors in something that’s easy to remove.
Things to cover your cabinet doors with:
Contact Paper
Also known as vinyl, contact paper is a self-adhesive removable paper which you simply stick on the cabinets. Click here to read our guide on how to find the most affordable peel and stick wall paper.
Wallpaper
Regular wallpaper and spray adhesive is easy to apply as well as remove, but best used to low-contact areas where it won’t get wet. Wayfair has some great options.
Fabric
Simply remove each cupboard door, wrap it in fabric and staple it at the back. Use a fabric protector spray to make the cabinets wipe-clean.
This pretty decorative masking tape is easy to stick to cabinets in strips.
Removable kitchen cabinet coverings come in a variety of patterns including faux wood grain, geometric shapes, floral designs, glossy colors and stainless steel-effect. For an eye-catching look, you could use different colors on designs on each cabinet to create a rainbow effect.
If you have glass-fronted kitchen cabinets, you can paint, wallpaper or use fabric inside of them to create a fresh new look.
Add New Handles and Knobs
It’s amazing how something as simple as adding new handles and knobs can give your kitchen a whole new look – It’s the perfect way to complement your newly-decorated cabinets.
Swap your boring old drawer pulls for new ones in the shape of giant crystals, cats’ faces or pineapples. If you can think of it, you can probably find a cupboard door knob in the shape of it online. Unique and interesting knobs are always a conversation piece at parties.
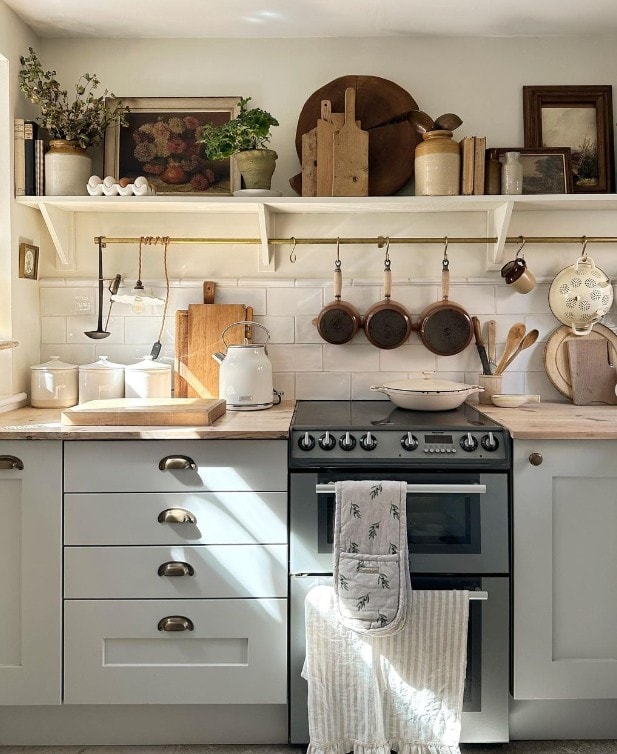
Remove Cabinet Doors to Create Open Shelves
By far the easiest way to refurbish old kitchen cabinets is to rip off the doors and throw them in the garbage!
Open shelving in place of upper cabinets can look fantastic, as long as what’s on display is visually appealing. This kitchen décor hack won’t work for the cupboard where you store your cans and jars, but it will look great for your plates, bowls and glasses.
Once the doors are removed, you’ll need to fill any holes from the hinges with filler.
To make your cabinets pop, a good trick is to paint or wallpaper the back wall of each cabinet in a dark color such as navy or grey. White crockery and glassware will look fabulous on display against a dark background.
Tip: Beware of cooking grease. Open-shelved cabinets are best positioned away from the cooker.
Update Kitchen Cabinet Doors with Molding
There are various types of moldings which can be added to existing kitchen cabinets to give them a new look. These are:
- Crown molding – A decorative trim which is added to the top of upper cabinets. It draws the eyes upwards and makes the cabinets look more elegant. You can even use self-adhesive foam molding for a budget friendly option.
- Riser molding – This raises the crown molding up so that it reaches the ceiling if you want to close off the space above cabinets.
- Base molding – Adds a level of detail between your lower cabinets and the floor.
- Light rail molding – Used underneath the upper cabinets to conceal lighting strips.
- Scribe molding – Fillers to cover any gaps between cabinets or where a cabinet meets the wall.
The various types of cabinet molding are fairly cheap buy and easy to install yourself.
Here’s a step-by-step guide to adding molding to your kitchen cabinets:
- Choose the right types and sizes of molding – Make sure you have enough for each area you want to add it to.
- Cut one side of the molding – Use straight cuts where it meets a wall and 45-degree miter angles for where the moldings meet at a corner
- Mark the other side of the molding – Hold it onto the cabinet in the exact position while you mark.
- Cut the other side of the molding – Again, be sure to use the correct angle for your cut.
- Secure the molding to the cabinet – Use a nail gun or a strong construction level adhesive.
This video shows how to install molding on to your kitchen cabinets:
Add Extra Cabinets Above Your Existing Ones
Nothing makes a kitchen look cluttered more than piles of stuff stored on top of the kitchen cabinets. In fact, one top tip for selling your house is to take all that stuff down and hide it in the basement or attic when potential buyers come around.
Of course, storing your blender in the attic isn’t the best long-term solution. So, instead we recommend creating extra storage space by building more cabinets on top of your existing ones.
With this method, the top of your existing upper cabinet becomes a shelf. You can then use plywood, cut to size to build up to the ceiling.
To cover your new upper cabinets, you have two options:
- Build new cabinet doors for the upper space and paint or cover them to match.
- Buy new larger doors that cover both the old cabinet and the new space you’ve created.
Building doors can be tricky and buying them can be expensive. However, a really cheap and easy alternative to building extra cabinets is to simply buy pretty storage boxes and place them on top of your exiting cabinets to conceal all your kitchen junk.
Just make sure to measure them before you buy so you know they’ll fit!
Illuminate Your Kitchen Cabinets with Lighting

Under-cabinet lighting not only adds a nice accent to your kitchen cabinets, it’s also practical as it makes it easier to see when preparing food on your countertops.
Kitchen cabinet lighting isn’t just for under the upper cabinets. You could also place it on top of the upper cabinets or beneath the lower cabinets at the toe-kick level.
This pack of three is completely wireless.
When adding cabinet lighting in your kitchen, measure the area under your cabinet faces to ensure that the lights can be hidden. You may also need to add molding to conceal them. If you’d rather avoid this step, look out for lights that look pretty enough that you don’t need to hide them.
Types of lights
Unless you’re a qualified electrician, you’ll probably want to steer clear of hard-wired lighting systems. Plug-in lights are super easy to install and come in a variety of types including LED strips, pucks, tape and rope. If you don’t have a plug socket nearby, battery-powered lighting is also an option.
Lighting colors
When it comes to lighting, there’s no such things as ‘white’. Warm white colors are good to create a nice ambiance, whereas cool whites are good for task lighting. Or for something really original, perhaps different colored lights would complement your cabinets?
Positioning
It’s best to place lights near the front of the cabinets. Don’t forget to make sure that the cables will reach the outlet. With puck lights, place one under each cabinet for an even look.
Fixing
How you attach the lights will depend on the type of lighting used. Puck lights often require screwing into place. Be sure to use short enough screws that you don’t screw right through the cabinet! For rope lights, you’ll be able to affix them easily with cord clips. Tape lights are the easiest to install as they come with self-adhesive backing
Update Your Kitchen Counter Tops
Once you have your lovely refurbished kitchen cabinets, you might also want to update your countertops to match.
Countertops can be made of various materials including wood, laminate, marble, granite and tile. With expensive countertops like wood, marble and granite, the best method to spruce them up, and certainly the one which you should try first, is usually a deep clean and the application of a special treatment to seal and protect the surface.
Another option is self-adhesive countertop contact paper.
To improve the look of laminate counter tops, you can get specialty countertop coatings in the form of stone-texture spray paint. You could even add a sprinkling of glitter to make your countertops literally sparkle.
When do kitchen cabinets need replacing?
Of course, not all old cabinets can be made to look new, sometimes you have to accept that your cabinets are beyond repair. If your kitchen cabinets aren’t functional, then painting them to make them look pretty could be a waste of time.
Here are three red flags that your kitchen cabinets should be replaced:
- The carcass is damaged – If the cabinet skeleton doesn’t feel firm, it could be time for a new one. If the cabinets are so worn that you’re unable to drill holes for new hinges, you’ll struggle to reattach the doors.
- The cabinets are moldy – Surface mold is easily cleaned using bleach. But if the mold is growing deep within the structure of the cabinets, you’ll need to replace them for the sake of your health.
The doors and drawers don’t work – Sticky drawers might be remedied with a squirt of lubricant and misaligned doors can be rehung. However, if this fails and your cabinets still don’t function well, it could be time to call it a day.
More Kitchen Ideas:
How to Choose the Best Kitchen Flooring Material
Best Kitchen Degreaser Reviews {plus the best degreaser for $1?!}
Best Kitchen Mat to Buy in 2021{reviews and buying guide}
The Most Affordable Farmhouse Kitchen Accessories
The best kitchen rugs: How to choose the perfect rug