
Gather round, turkey lovers! Thanksgiving is just around the corner, and what better way to get in the holiday spirit than with some easy DIY decorations?
This post contains affiliate links. Please read our full disclosure here.
Whether you’re hosting a big family feast or just want to add a little festive flair to your home, these DIY Thanksgiving decorations are sure to impress.
From charming napkin rings to rustic wall art, we’ve got you covered with fun and creative ideas that won’t break the bank.
So grab your glue gun and get ready to add some serious style to your Thanksgiving celebration!

Rustic Turkey Center Piece

Made in a Day has a fun and rustic tutorial on how to make a turkey centerpiece that is perfect for Thanksgiving tablescapes!
To make this charming and unique centerpiece, you’ll need just a few materials:
- A wooden slice or plank
- Twine
- Feathers
- Glue
- Scissors
- Faux greenery (optional)
First, use twine to create a turkey body shape on the wooden slice or plank.
Next, glue feathers onto the twine to create the turkey’s tail.
Then, add some extra decorations to the centerpiece, such as faux greenery or a small sign.
Finally, place the centerpiece on your Thanksgiving table and enjoy the rustic and charming vibe it adds to your decor!
Lighted Thanksgiving Center Piece

Ann’s Entitled Life has a fun and budget-friendly tutorial on how to make a lighted Thanksgiving centerpiece using dollar store items!
To make this charming and festive centerpiece, you’ll need just a few materials:
- A glass vase or jar
- LED string lights
- Fall foliage or flowers
- Scissors
- Ribbon or twine (optional)
First, fill the glass vase or jar with fall foliage or flowers.
Next, wrap the LED string lights around the foliage or flowers to create a warm and inviting glow.
Then, add some extra decorations to the centerpiece, such as ribbon or twine, to complete the look.
Finally, turn on the lights and enjoy the cozy and festive atmosphere this centerpiece adds to your Thanksgiving table!
DIY Corn Husk Wreath

Design Improvised has a fun and creative tutorial on how to make Thanksgiving crafts that are perfect for decorating your home and table!
To make these charming and festive crafts, you’ll need just a few materials:
- Construction paper
- Scissors
- Glue
- Paint
- Paintbrushes
- Twine or ribbon (optional)
First, create a construction paper turkey by cutting out feathers, a body, and a head, and then gluing them together.
Next, make a leaf garland by painting leaves in fall colors and attaching them to twine or ribbon.
Then, create a pumpkin centerpiece by painting a pumpkin in a fun and unique design.
Finally, you can add some extra decorations to your crafts, such as glitter or stickers.
Cute Twine Pumpkins

The Country Chic Cottage has a fun and creative tutorial on how to make adorable pumpkins using bakers twine!
To make these charming and rustic pumpkins, you’ll need just a few materials:
- Bakers twine in fall colors
- Scissors
- Green pipe cleaners
- Glue
- A small piece of cardboard
First, wrap the bakers twine around the cardboard multiple times to create a thick bundle.
Next, tie a piece of twine around the center of the bundle and cut the loops on both ends.
Then, fluff out the twine and shape it into a pumpkin shape.
Next, cut a small piece of green pipe cleaner and twist it into a stem shape.
Finally, glue the stem to the top of the pumpkin and enjoy your charming and rustic fall decor!
DIY Thanksgiving Doily Banner

Mod Podge Rocks Blog has a fun and easy tutorial on how to make a DIY Thanksgiving doily banner that is perfect for adding a touch of elegance to your fall decor!
To make this charming and festive banner, you’ll need just a few materials:
- Doilies in fall colors
- Twine or ribbon
- Scissors
- Glue
- Paint or markers (optional)
First, fold the doilies in half and cut out a triangle shape from the center to create a banner shape.
Next, string the doilies onto the twine or ribbon and arrange them in the order you like.
Then, add some extra decorations to the banner, such as painted or markered designs, to complete the look.
Finally, hang the banner on your wall or mantle and enjoy the elegant and festive touch it adds to your fall decor!
Free Printable Thankful Sign

Mama Cheaps has a fun and free tutorial on how to make a printable “Thankful” sign that is perfect for adding a heartwarming touch to your fall decor!
To make this charming and meaningful sign, you’ll need just a few materials:
- A printer
- Cardstock or paper
- A frame (optional)
First, download and print the “Thankful” sign from Mama Cheaps onto cardstock or paper.
Next, trim the paper to fit your frame, if using.
Then, add some extra decorations to the sign, such as glitter or stickers, to complete the look.
Finally, place the sign in a frame and display it on your wall or mantle to remind yourself and your guests of all the things you are thankful for this season!
Thanksgiving Mason Jar Craft

The Country Chic Cottage has a fun and creative tutorial on how to make a Thanksgiving mason jar craft that is perfect for adding a rustic and charming touch to your fall decor!
To make this charming and festive craft, you’ll need just a few materials:
- A mason jar
- Fall foliage or flowers
- Twine or ribbon
- Scissors
- Glue
First, fill the mason jar with fall foliage or flowers.
Next, wrap twine or ribbon around the jar and tie a bow to create a rustic and charming look.
Then, add some extra decorations to the jar, such as a small sign or a painted design, to complete the look.
Finally, place the jar on your table or mantle and enjoy the cozy and festive atmosphere it adds to your fall decor!
DIY Autumn Leaf Fairy Lights

Wallflower Kitchen has a fun and whimsical tutorial on how to make DIY autumn leaf fairy lights that are perfect for adding a touch of magic to your fall decor!
To make these charming and enchanting fairy lights, you’ll need just a few materials:
- Artificial autumn leaves
- String lights or fairy lights
- Glue
- Scissors
First, separate the leaves from their stems and cut them into small shapes.
Next, glue the leaves onto the string lights or fairy lights, spacing them out evenly.
Then, turn on the lights and enjoy the warm and cozy atmosphere they add to your fall decor!
Mason Jar Pumpkins

The Soccer Mom Blog has a fun and easy tutorial on how to make adorable mason jar pumpkins that are perfect for adding a charming and festive touch to your fall decor!
To make these cute and festive pumpkins, you’ll need just a few materials:
- Mason jars
- Orange paint
- Green pipe cleaners
- Twine or ribbon
- Scissors
- Glue
First, paint the mason jars orange and let them dry completely.
Next, twist the green pipe cleaners into stem shapes and glue them to the top of the jars.
Then, wrap twine or ribbon around the jars and tie a bow to create a rustic and charming look.
Finally, place the jars on your table or mantle and enjoy the cozy and festive atmosphere they add to your fall decor!
Easy DIY Tin Can Pumpkins

Mixed Kreations has a fun and creative tutorial on how to make easy DIY tin can pumpkins that are perfect for adding a rustic and charming touch to your fall decor!
To make these charming and festive pumpkins, you’ll need just a few materials:
- Tin cans
- Orange paint
- Green pipe cleaners
- Twine or ribbon
- Scissors
- Glue
First, paint the tin cans orange and let them dry completely.
Next, twist the green pipe cleaners into stem shapes and glue them to the top of the cans.
Then, wrap twine or ribbon around the cans and tie a bow to create a rustic and charming look.
Finally, place the cans on your table or mantle and enjoy the cozy and festive atmosphere they add to your fall decor!
Pinecone Succulent Craft

Family Spice has a fun and unique tutorial on how to make succulent pinecones that are perfect for adding a natural and earthy touch to your Thanksgiving centerpiece!
To make these charming and creative succulent pinecones, you’ll need just a few materials:
- Pinecones
- Succulent cuttings
- Floral wire
- Wire cutters
- Glue
First, trim the succulent cuttings to fit the size of the pinecones.
Next, wrap the floral wire around the base of the succulent and twist it together to create a stem.
Then, insert the stem into the pinecone and glue it in place.
Finally, arrange the succulent pinecones in a vase or on a platter to create a unique and natural Thanksgiving centerpiece!
Farmhouse Thanksgiving Sign

DIY Candy has a fun and easy tutorial on how to make a farmhouse Thanksgiving sign that is perfect for adding a rustic and charming touch to your fall decor!
To make this charming and festive sign, you’ll need just a few materials:
- A wooden board
- Stencils or vinyl letters
- Paint
- Sandpaper
- A paintbrush
First, sand the wooden board to create a smooth surface.
Next, paint the board with a base color and let it dry completely.
Then, add your stencils or vinyl letters to the board and paint over them with a contrasting color.
Next, remove the stencils or vinyl letters and let the paint dry completely.
Finally, sand the edges of the board to create a distressed and rustic look.
DIY Thankful Tree for Thanksgiving

Simply 2 Moms has a fun and heartwarming tutorial on how to make a thankful tree that is perfect for adding a meaningful and interactive touch to your Thanksgiving decor!
To make this charming and thoughtful tree, you’ll need just a few materials:
- A vase or container
- Branches or twigs
- Construction paper or cardstock
- Scissors
- Pens or markers
- Tape or glue
First, fill the vase or container with the branches or twigs to create the tree.
Next, cut out leaf shapes from the construction paper or cardstock.
Then, write things you’re thankful for on the leaves and tape or glue them onto the branches.
Finally, display the tree on your table or mantle and encourage your guests to add their own leaves to the tree throughout the Thanksgiving season!
Plaid Thanksgiving Pallet Wall Art

DIY Adulation has a fun and stylish tutorial on how to make plaid Thanksgiving wall art that is perfect for adding a cozy and festive touch to your fall decor!
To make this charming and trendy wall art, you’ll need just a few materials:
- A canvas
- Plaid fabric
- Mod Podge
- Scissors
- A paintbrush
First, cut the plaid fabric to fit the size of the canvas.
Next, apply Mod Podge to the canvas and place the fabric on top, smoothing out any wrinkles or bubbles.
Then, apply another layer of Mod Podge on top of the fabric to seal it in place.
Next, use the paintbrush to paint a Thanksgiving message or design on top of the fabric.
Finally, let the wall art dry completely and display it on your wall to add a cozy and festive atmosphere to your fall decor!
Be Grateful Thanksgiving Tray
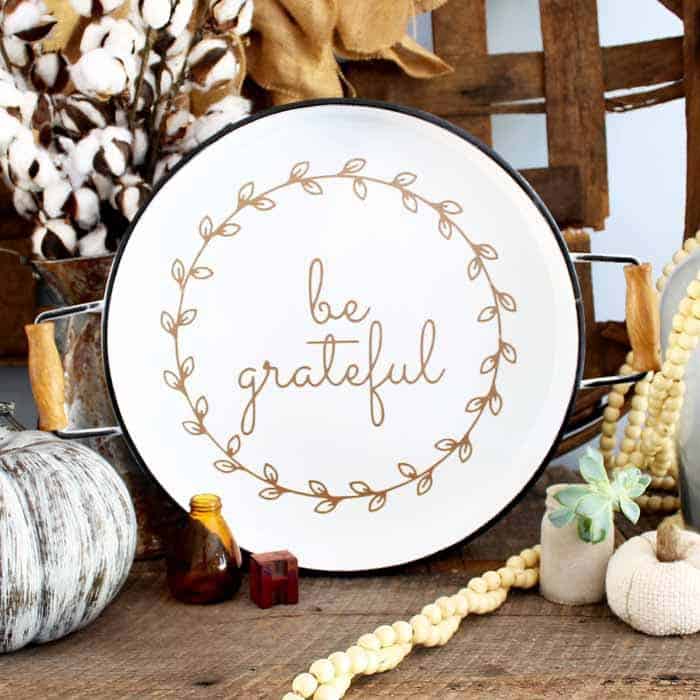
The Country Chic Cottage has a fun and creative tutorial on how to decorate trays that are perfect for adding a charming and personalized touch to your home decor!
To make these charming and versatile tray decorations, you’ll need just a few materials:
- A tray
- Decorative items such as candles, flowers, and greenery
- Twine or ribbon
- Scissors
- Glue
First, choose a tray that fits the style and color scheme of your home decor.
Next, arrange your decorative items on the tray in a way that is aesthetically pleasing to you.
Then, add some extra decorations to the tray, such as twine or ribbon, to complete the look.
Finally, place the tray on your table or mantle and enjoy the cozy and personalized atmosphere it adds to your home decor!
DIY Book Page Turkey Napkin Rings

A Wonderful Thought has a fun and creative tutorial on how to make Thanksgiving napkin rings that are perfect for adding a charming and festive touch to your holiday table!
To make these adorable and unique napkin rings, you’ll need just a few materials:
- Book pages or scrapbook paper
- Acorn caps
- Googly eyes
- Feathers
- Glue
- Scissors
First, cut the book pages or scrapbook paper into small circles.
Next, glue the acorn caps onto the circles and add googly eyes and feathers to create a turkey face.
Then, wrap the napkin rings around your napkins and secure them in place with glue.
Finally, place the napkins on your holiday table and enjoy the charming and festive atmosphere they add to your Thanksgiving celebration!
DIY Fall Mason Jar Sign

The Craft Patch Blog has a fun and easy tutorial on how to make a DIY fall decor mason jar sign that is perfect for adding a rustic and charming touch to your home decor!
To make this charming and festive sign, you’ll need just a few materials:
- A wooden board
- Mason jars
- Paint
- Sandpaper
- A paintbrush
- Twine or ribbon
- Flowers or greenery
- Glue
First, paint the wooden board with a base color and let it dry completely.
Next, sand the edges of the board to create a distressed and rustic look.
Then, paint the mason jars with a contrasting color and let them dry completely.
Next, tie twine or ribbon around the necks of the mason jars and add flowers or greenery to create a charming and festive look.
Finally, glue the mason jars to the wooden board and display it on your wall to add a cozy and rustic atmosphere to your fall decor!
DIY Painted Wood Pumpkins

Megan Plus Five has a fun and creative DIY craft kit tutorial on how to paint your standing wood pumpkin cutouts that are perfect for adding a festive and personalized touch to your fall decor!
To make these charming and unique pumpkin cutouts, you’ll need just a few materials:
- Standing wood pumpkin cutouts
- Paint
- Paintbrushes
- Stencils or vinyl letters (optional)
First, choose the standing wood pumpkin cutouts that fit the style and color scheme of your fall decor.
Next, paint the pumpkins with a base color and let them dry completely.
Then, add your own personal touch to the pumpkins by painting designs, patterns, or messages on them with different colors of paint.
Next, use stencils or vinyl letters to add additional designs or messages to the pumpkins, if desired.
Finally, display the pumpkins on your table or mantle and enjoy the festive and personalized atmosphere they add to your fall decor!
Dollar Tree Pumpkin

The Maker’s Map has a fun and budget-friendly tutorial on how to make Dollar Tree mini pumpkin DIY fall decor that is perfect for adding a festive and charming touch to your home decor!
To make these adorable and affordable mini pumpkins, you’ll need just a few materials:
- Mini pumpkins from Dollar Tree
- Paint
- Paintbrushes
- Twine or ribbon
- Hot glue gun
First, choose the mini pumpkins that fit the style and color scheme of your fall decor.
Next, paint the pumpkins with a base color and let them dry completely.
Then, add your own personal touch to the pumpkins by painting designs, patterns, or messages on them with different colors of paint.
Next, tie twine or ribbon around the stems of the pumpkins to add a charming and rustic touch.
Finally, display the mini pumpkins on your table or mantle and enjoy the festive and budget-friendly atmosphere they add to your fall decor!
And there you have it, folks! With these easy DIY Thanksgiving decorations, you’ll be able to create a festive and cozy atmosphere that your guests will love. Whether you’re a seasoned crafter or a DIY newbie, these ideas are simple, affordable, and guaranteed to impress.
So why not put your creative skills to the test and add a personal touch to your Thanksgiving celebration? We wish you a happy and crafty Thanksgiving!

More From Tiny Tree:
34 Cheap and Easy DIY Outdoor Halloween Decorations {that ANYONE can make!}
15 DIY Wall Art Ideas {diy home decor that’s easy and fun to make!}