


Summer is here, and it’s time to give your home a fresh and vibrant look! Whether you’re hosting a summer party or just want to spruce up your living space, DIY summer decor projects are the perfect way to add some fun and creativity to your home.
This post contains affiliate links. Please read our full disclosure here.
From beach-themed decor to colorful floral arrangements and marbled pots, there are endless possibilities to explore.
So, grab your crafting supplies and get ready to dive into our guide on the best DIY summer decor projects that will add a touch of sunshine to your home!

Easy Tulip Wreath
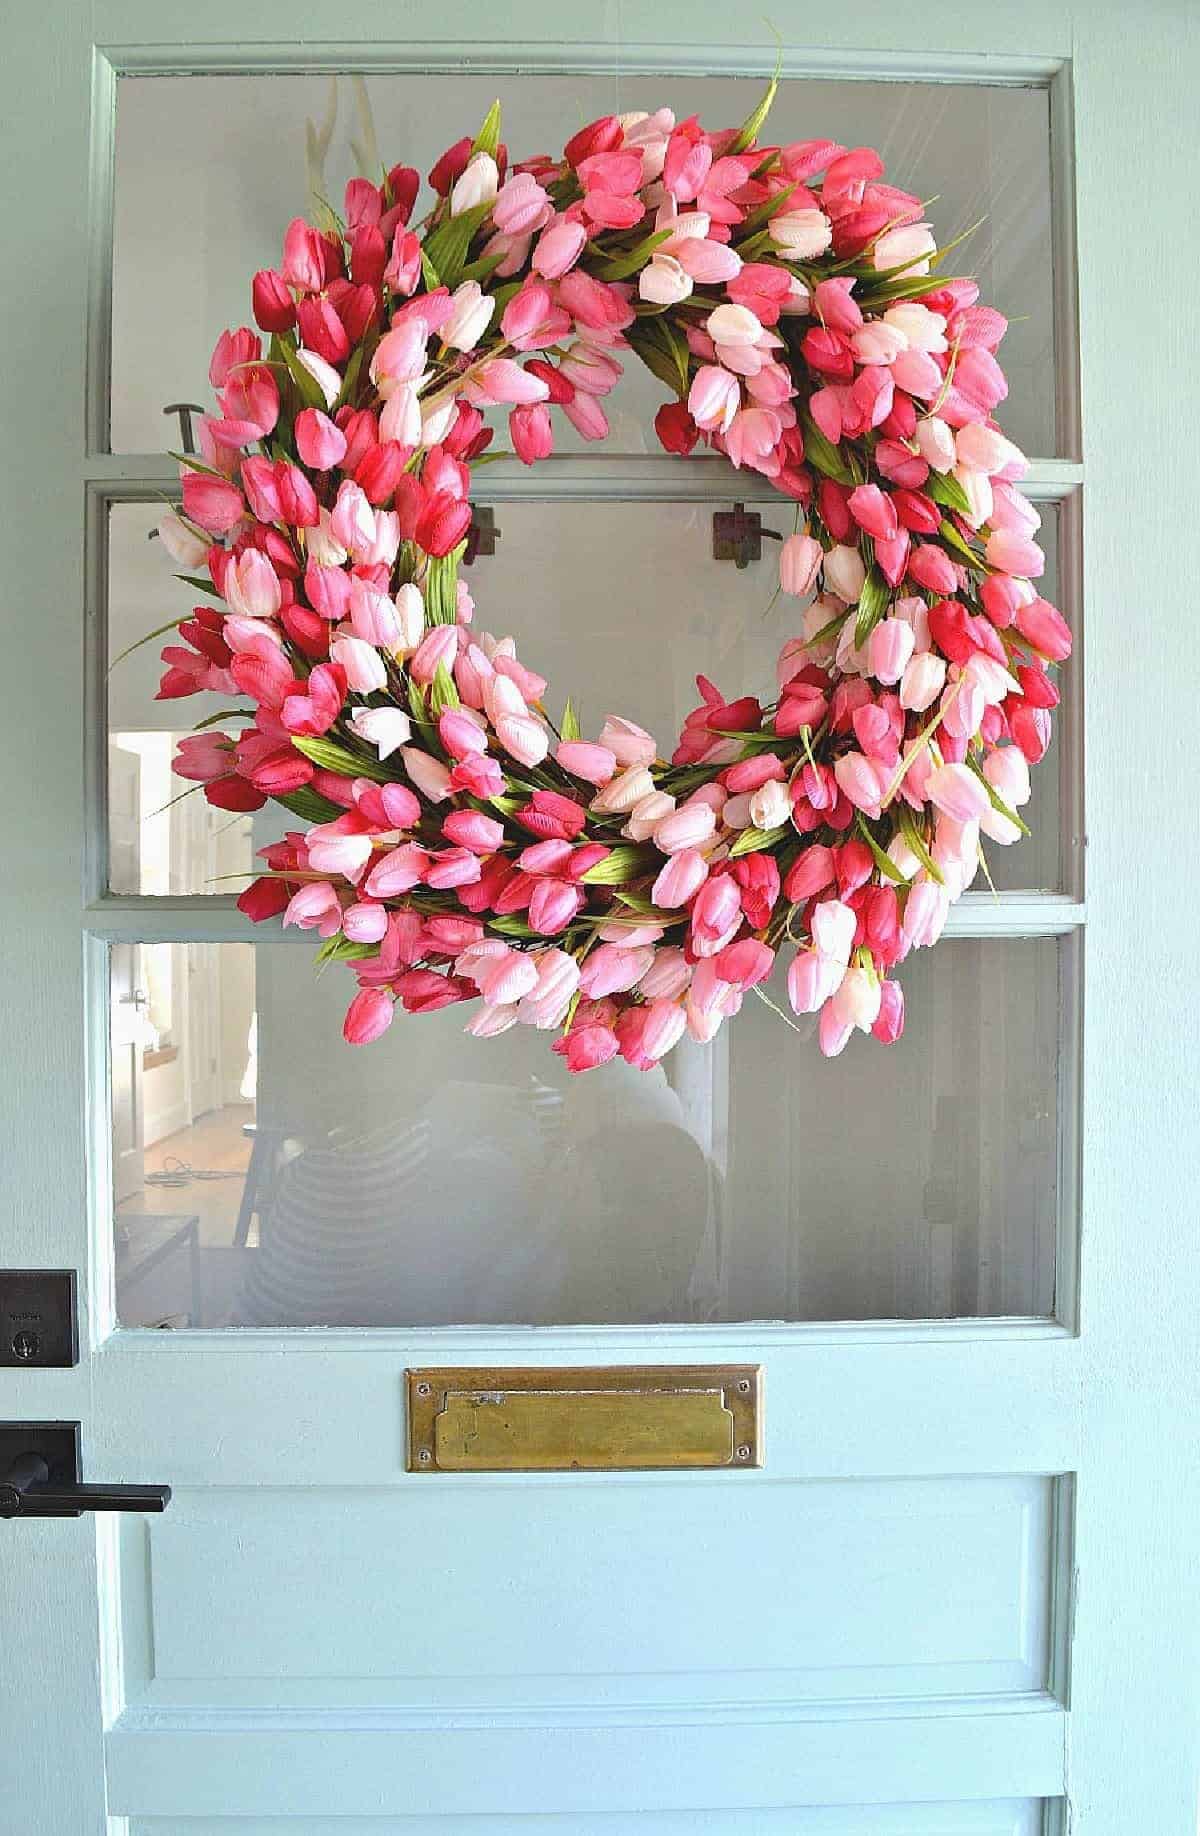
Chatfield Court has a fun and easy tutorial on how to make a DIY tulip wreath that will add a pop of color to your front door!
To make the DIY tulip wreath, you’ll need just a few materials:
- Grapevine wreath
- Faux tulips
- Wire cutters
- Floral wire
- Ribbon
Once you have your supplies, it’s time to get started! First, use the wire cutters to cut the stems off of the faux tulips.
Next, attach the tulips to the grapevine wreath using floral wire.
Once all of the tulips are attached, add a ribbon to the top of the wreath for hanging.
Finally, hang the wreath on your front door and enjoy the beautiful pop of color it adds to your home.
The end result is a gorgeous and vibrant tulip wreath that’s perfect for spring and summer.
RELATED: Spruce Up Your Doorstep with DIY Summer Wreath Ideas!
Lavender Painted Mason Jars

It All Started With Paint has a beautiful and creative tutorial on how to make lavender flower painted mason jars that will add a touch of rustic charm to your home decor!
To make the lavender flower painted mason jars, you’ll need just a few materials:
- Mason jars
- Paint in shades of lavender and green
- Paintbrushes
- Sandpaper
- Twine
- Lavender flowers
Once you have your supplies, it’s time to get started! First, paint the mason jars in shades of lavender and green, alternating colors for a beautiful effect.
Once the paint is dry, use sandpaper to distress the jars for a rustic look.
Tie twine around the top of the jars for a finishing touch.
Finally, add lavender flowers to the jars and display them in your home for a beautiful and fragrant decoration.
The end result is a stunning and unique set of lavender flower painted mason jars that will add a touch of rustic charm to any room.
DIY Seaglass Bottles

Liz Marie Blog has a fun and easy tutorial on how to make DIY sea glass bottles that will add a touch of coastal charm to your home decor!
To make the DIY sea glass bottles, you’ll need just a few materials:
- Glass bottles or jars
- Mod Podge
- Food coloring in shades of blue and green
- Sandpaper
- Twine or rope
Once you have your supplies, it’s time to get started! First, mix Mod Podge with food coloring in shades of blue and green to create a sea glass effect.
Apply the mixture to the glass bottles or jars and let them dry completely.
Once the bottles are dry, use sandpaper to distress them for a more realistic look.
Tie twine or rope around the neck of the bottles for a finishing touch.
Finally, display the DIY sea glass bottles in your home for a beautiful and coastal decoration.
The end result is a stunning and unique set of sea glass bottles that will add a touch of coastal charm to any room.
Summery Rope Wrapped Candle Holders

StoneGable Blog has a fun and easy tutorial on how to make a rope-wrapped candle holder that will add a touch of rustic charm to your home decor!
To make the rope-wrapped candle holder, you’ll need just a few materials:
- Glass candle holder
- Twine or rope
- Hot glue gun
- Scissors
- Candle
Once you have your supplies, it’s time to get started! First, apply hot glue to the bottom of the glass candle holder.
Wrap twine or rope around the bottom of the candle holder, applying hot glue as you go to secure it in place.
Continue wrapping the twine or rope around the candle holder until it’s completely covered.
Once the candle holder is covered, trim the excess twine or rope with scissors.
Finally, add a candle to the candle holder and display it in your home for a beautiful and rustic decoration.
The end result is a stunning and unique rope-wrapped candle holder that will add a touch of rustic charm to any room.
Rustic Ladder
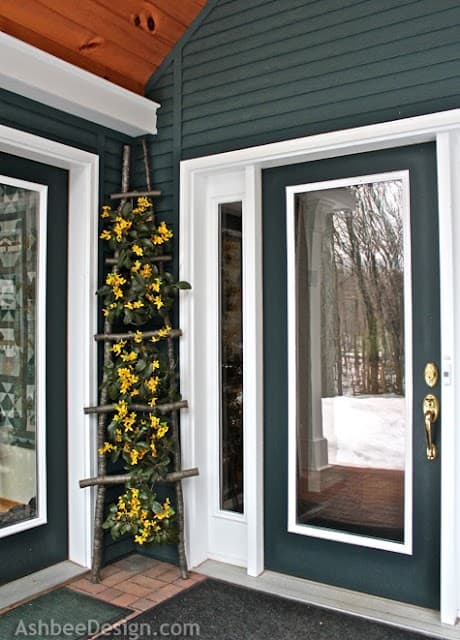
Ashbee Design has a creative and versatile tutorial on how to use ladders in home decor that will add a touch of rustic charm to your living space!
To use ladders in home decor, you’ll need just a few materials:
- Ladder(s)
- Paint or stain (optional)
- Hooks or nails
- Decorative items (e.g. plants, blankets, towels)
Once you have your supplies, it’s time to get started! First, decide where you want to place the ladder(s) in your home.
If desired, paint or stain the ladder(s) to match your decor.
Hang the ladder(s) on the wall using hooks or nails.
Finally, add decorative items to the ladder(s), such as plants, blankets, or towels, for a beautiful and functional display.
The end result is a stunning and unique use of ladders in home decor that will add a touch of rustic charm to any room.
DIY Paint Stick Box

Build Basic has a fun and easy tutorial on how to make a paint stick basket that will add a touch of rustic charm to your home decor!
To make the paint stick basket, you’ll need just a few materials:
- Paint sticks
- Wood glue
- Clothespins
- Jute twine
- Scissors
Once you have your supplies, it’s time to get started! First, use wood glue to attach the paint sticks together in a basket shape.
Use clothespins to hold the paint sticks in place while the glue dries.
Once the glue is dry, remove the clothespins and tie jute twine around the top of the basket to secure the paint sticks in place.
Finally, use scissors to trim the excess twine and display the paint stick basket in your home for a beautiful and rustic decoration.
The end result is a stunning and unique paint stick basket that will add a touch of rustic charm to any room.
Painted Daisy Mason Jars

Mason Jar Crafts Love has a fun and creative tutorial on how to make painted daisy mason jars that will add a touch of whimsy to your home decor!
To make the painted daisy mason jars, you’ll need just a few materials:
- Mason jars
- Acrylic paint in shades of white, yellow, and green
- Paintbrushes
- Black permanent marker
- Daisy stencils (optional)
Once you have your supplies, it’s time to get started! First, paint the mason jars white and let them dry completely.
Next, use yellow paint to create the petals of the daisies and green paint to create the stems and leaves.
Once the paint is dry, use a black permanent marker to add details to the daisies, such as the center of the flower and the outline of the petals.
If desired, use daisy stencils to create a more uniform look.
Finally, display the painted daisy mason jars in your home for a beautiful and whimsical decoration.
The end result is a stunning and unique set of painted daisy mason jars that will add a touch of whimsy to any room.
Hello Summer Banner

Today’s Creative Life has a fun and easy tutorial on how to make a DIY summer banner that will add a touch of seasonal charm to your home decor!
To make the DIY summer banner, you’ll need just a few materials:
- Cardstock or scrapbook paper in shades of blue, yellow, and green
- Scissors
- Twine
- Glue stick
- Hole punch
- Summer-themed stencils (optional)
Once you have your supplies, it’s time to get started! First, cut the cardstock or scrapbook paper into triangle shapes.
Use a glue stick to attach the triangles to twine, leaving space between each triangle.
If desired, use summer-themed stencils to add designs to the triangles.
Once the triangles are decorated, use a hole punch to create holes at the top corners of each triangle.
Finally, string the twine through the holes and display the DIY summer banner in your home for a beautiful and seasonal decoration.
The end result is a stunning and unique DIY summer banner that will add a touch of seasonal charm to any room.
Living Succulent Wreath

Pretty Prudent has a fantastic tutorial on how to make a living succulent wreath that will add a touch of natural beauty to your home decor!
To make this stunning living succulent wreath, you’ll need just a few materials:
- Succulent cuttings
- Wreath form
- Sphagnum moss
- Floral wire
- Fishing line
First, soak the wreath form in water for about 30 minutes. Then, cover the wreath form with sphagnum moss, using floral wire to secure it in place.
Next, use fishing line to attach the succulent cuttings to the wreath form, spacing them out evenly. Finally, mist the succulent cuttings with water and hang the living succulent wreath in a bright, sunny spot.
Prism Shelves for Bathroom

Repurpose and Upcycle has a clever tutorial that will help you create stylish bathroom shelves using prism shelf brackets!
To make these trendy bathroom shelves, you’ll need just a few materials:
- Prism shelf brackets
- Wood boards
- Wood glue
- Screws
- Drill
- Level
First, measure and cut your wood boards to the desired length for your shelves. Apply wood glue to the top of the prism shelf brackets and attach them to the wood boards.
Next, use your drill to attach the wood boards to the wall using screws. Make sure to use a level to ensure that your shelves are straight and even.
Finally, style your new bathroom shelves with your favorite bathroom decor items, such as plants, candles, or towels.
Floral Summer Wagon Wheel

Lolly Jane has an awesome tutorial on how to make a rustic wagon wheel wreath that will add a touch of country charm to your home decor!
To make this charming wagon wheel wreath, you’ll need just a few materials:
- Wagon wheel
- Floral wire
- Faux greenery
- Faux flowers
- Ribbon
First, use floral wire to attach the faux greenery and flowers to the wagon wheel, spacing them out evenly. Be sure to secure them tightly so they don’t fall off.
Next, add a ribbon to the top of the wagon wheel for hanging. You can use any type of ribbon you like to match your home decor style.
Finally, hang your new rustic wagon wheel wreath on your front door or anywhere in your home for a touch of country charm.
Summer Mantel with Vintage Jars and Lemons

Virginia Sweet Pea has a delightful tutorial on how to create a summer mantel using mason jars and lemons that will add a touch of refreshing summer vibes to your home decor!
To make this summer mantel, you’ll need just a few materials:
- Mason jars
- Lemons
- Faux greenery
- Twine
- Burlap ribbon
- White paint
- Paint brush
First, paint your mason jars with white paint and let them dry completely. Then, tie twine around the neck of the mason jars to add a rustic touch.
Next, fill the mason jars with sliced lemons and faux greenery, such as eucalyptus or ferns. Be sure to arrange the lemons and greenery in a way that looks pleasing to the eye.
Finally, tie burlap ribbon around the top of the mantel and arrange the mason jars on top. You can also add other summer decor items, such as seashells or starfish, to complete the look.
Summery Vertical Herb Garden

Brit + Co has a fantastic tutorial on how to create a vertical garden that will add a touch of greenery to your home decor!
To make this stylish vertical garden, you’ll need just a few materials:
- Wooden pallet
- Landscape fabric
- Staple gun
- Potting soil
- Plants
First, cover the back of the wooden pallet with landscape fabric and staple it in place. This will help keep the soil and plants in place.
Next, fill the pallet with potting soil, making sure to pack it in tightly. Then, add your plants to the pallet, spacing them out evenly and making sure they have enough room to grow.
Finally, hang your new vertical garden on a wall or fence using hooks or brackets. Be sure to water your plants regularly and enjoy the natural beauty they bring to your home decor.
Watercolor Planter

Brit + Co also has an awesome tutorial on how to make a DIY Sharpie watercolor planter that will add a pop of color to your home decor!
To make this fun and colorful planter, you’ll need just a few materials:
- White ceramic planter
- Sharpie markers
- Rubbing alcohol
- Paint brush
- Water
First, use your Sharpie markers to draw a design on the white ceramic planter. You can use any colors and designs you like to match your home decor style.
Next, use a paint brush to apply rubbing alcohol to the design. This will help the colors blend together and create a watercolor effect.
Finally, fill the planter with soil and your favorite plants. You can use any type of plant you like, such as succulents or herbs, to make your planter even more personalized.
DIY Ice Cream Garland

Growing Up Gabel has a sweet tutorial on how to make an ice cream cone garland that will add a touch of whimsy to your home decor!
To make this adorable ice cream cone garland, you’ll need just a few materials:
- Colored cardstock
- Scissors
- Glue stick
- Twine
- Pom poms
- Hole punch
First, cut out ice cream cone shapes from the colored cardstock. You can use any colors you like to match your home decor style.
Next, use a glue stick to attach pom poms to the top of the ice cream cones to represent scoops of ice cream.
Then, punch a hole in the top of each ice cream cone and thread them onto a piece of twine to create the garland.
Finally, hang your new ice cream cone garland on a wall or across a mantel to add a touch of whimsy to your home decor.
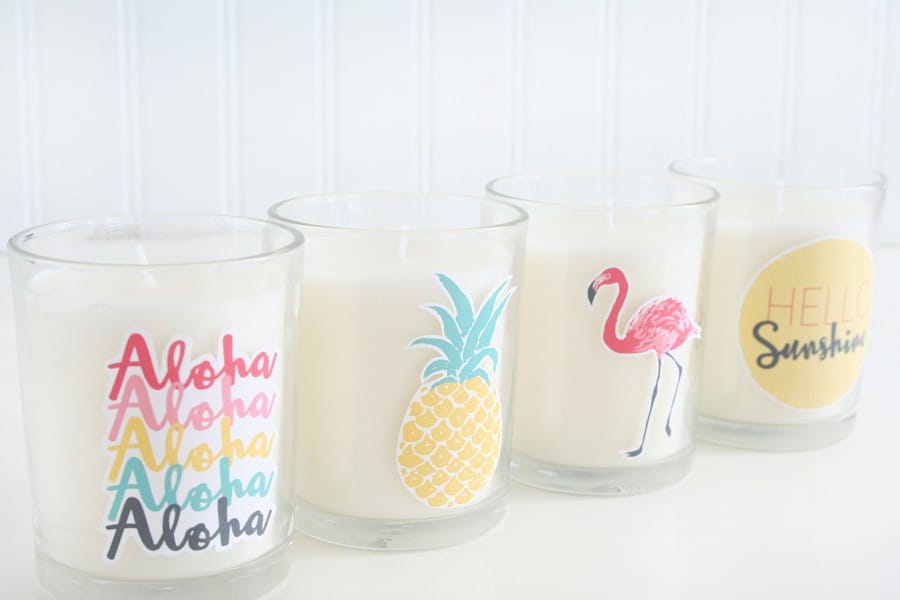
No Sew Lemon Banner

This Instagram post from @theconfettibar shows a fun and colorful tutorial on how to make a DIY confetti tray that will add a pop of color to your home decor!
To make this colorful confetti tray, you’ll need just a few materials:
- Clear tray
- Mod Podge
- Paint brush
- Confetti
- Glitter
First, use a paint brush to apply Mod Podge to the bottom of the clear tray. Be sure to apply it evenly so that the confetti and glitter will stick.
Next, sprinkle confetti and glitter onto the Mod Podge. You can use any colors and types of confetti and glitter you like to match your home decor style.
Finally, let the Mod Podge dry completely and enjoy your new DIY confetti tray! You can use it to display your favorite items or as a colorful centerpiece.
Fishermen Netting Wrapped Jars

Stow and Tell U has a creative tutorial on how to make decorative fisherman netting-wrapped jars that will add a touch of coastal charm to your home decor!
To make these charming jars, you’ll need just a few materials:
- Mason jars
- Fisherman netting
- Twine
- Scissors
- Hot glue gun
First, cut a piece of fisherman netting that is large enough to wrap around the mason jar. Then, wrap the netting around the jar and secure it in place with hot glue.
Next, wrap twine around the top of the jar to add a rustic touch. You can tie a bow or leave the twine plain, depending on your personal style.
Finally, fill the jars with your favorite items, such as seashells or candles, and enjoy your new coastal-inspired home decor!
Dollar Store Ombre Vases

Living Well Spending Less has a fantastic tutorial on how to create dollar store spring ombre vases that will add a pop of color to your home decor!
To make these colorful vases, you’ll need just a few materials:
- Glass vases
- Acrylic paint in various colors
- Paint brush
- Paper plate
First, pour a small amount of acrylic paint onto a paper plate. Then, use a paint brush to apply the paint to the bottom of the glass vase.
Next, add a little bit of white paint to the original color to create a lighter shade. Use the new color to paint the middle section of the vase.
Finally, add even more white paint to the original color to create an even lighter shade. Use this color to paint the top section of the vase.
Repeat these steps for each vase, using different colors to create a beautiful ombre effect.
DIY Seashell Candles
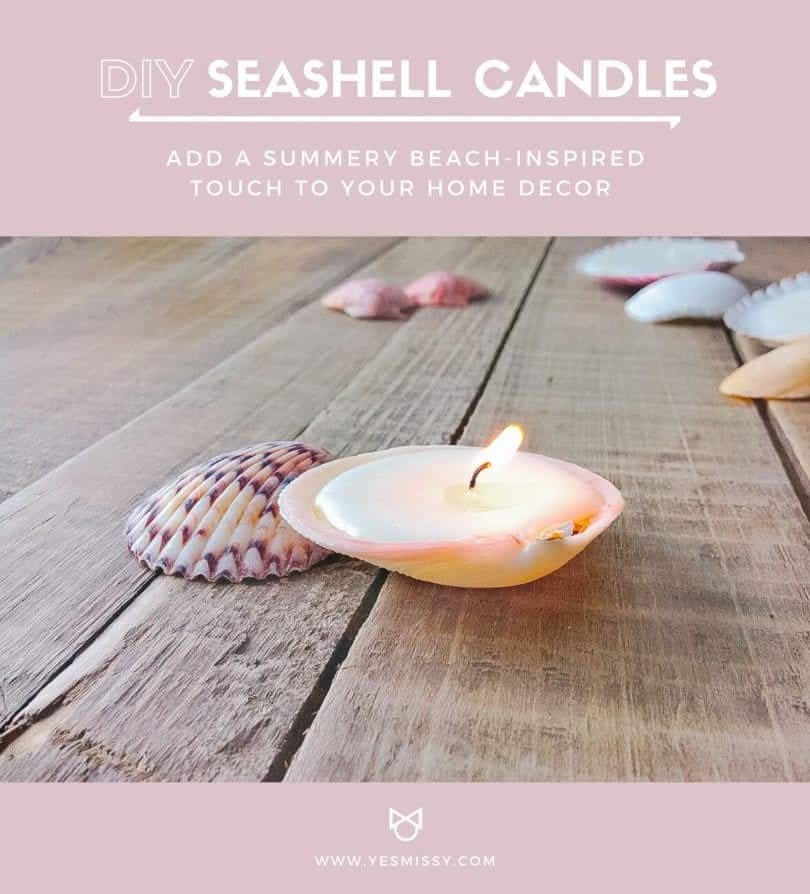
Yes Missy has a beautiful tutorial on how to make DIY seashell candles that will add a touch of beachy elegance to your home decor!
To make these stunning seashell candles, you’ll need just a few materials:
- Seashells
- Wax flakes
- Candle wicks
- Double boiler
- Essential oils (optional)
- Wooden skewers
First, melt the wax flakes in a double boiler. You can add a few drops of your favorite essential oil to the wax for a lovely scent.
Next, use a wooden skewer to dip the candle wick into the melted wax. Then, place the wick into the center of the seashell and hold it in place until the wax hardens.
Finally, pour the melted wax into the seashell, filling it to the top. Let the wax cool and harden completely before trimming the wick.
Repeat these steps for each seashell candle, using different sizes and shapes of seashells to create a beautiful collection.
Patriotic Mason Jars

Maison de Pax has a patriotic tutorial on how to make American flag mason jars that will add a touch of Americana to your home decor!
To make these festive mason jars, you’ll need just a few materials:
- Mason jars
- Red, white, and blue acrylic paint
- Paint brushes
- Star stickers
- Sandpaper
First, paint the entire mason jar white and let it dry completely. Then, place star stickers on the jar in a pattern that resembles the American flag.
Next, paint the area around the star stickers blue and let it dry completely. Then, carefully remove the star stickers to reveal the white stars.
Finally, paint the remaining area red and let it dry completely. Use sandpaper to distress the jar and give it a rustic look.
Repeat these steps for each mason jar, using different sizes to create a beautiful collection.
Summer Washi Tape Art
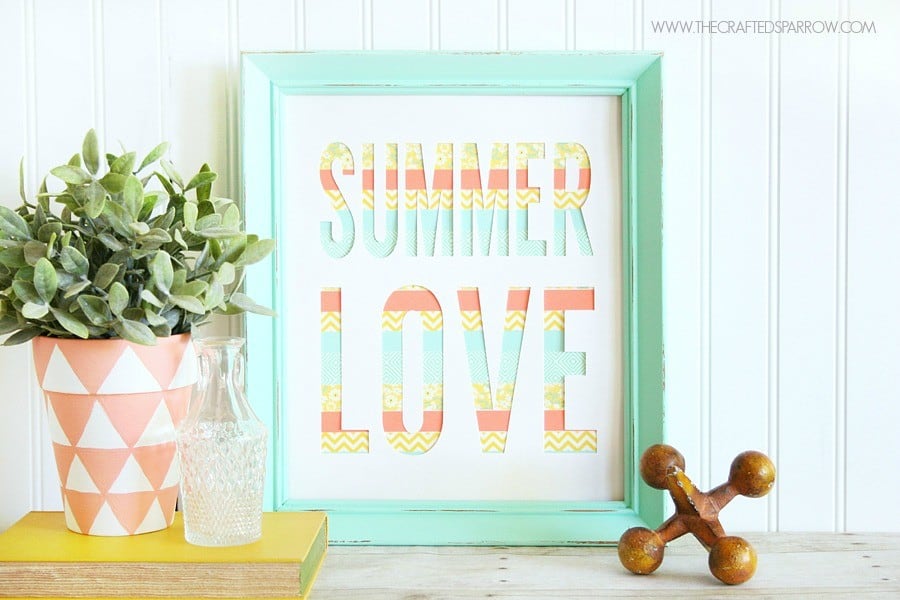
The Crafted Sparrow has a fun and colorful tutorial on how to make summer washi tape art that will add a pop of color to your home decor!
To make this vibrant washi tape art, you’ll need just a few materials:
- White cardstock
- Washi tape in various colors and patterns
- Scissors
- Picture frame
First, cut the white cardstock to fit inside the picture frame. Then, use the washi tape to create a colorful design on the cardstock. You can use any colors and patterns you like to match your home decor style.
Next, use scissors to trim the washi tape to fit the cardstock. You can cut the tape into different shapes and sizes to create a unique design.
Finally, place the washi tape art inside the picture frame and display it on a wall or mantel to add a pop of color to your home decor.
Summer Wood Banner
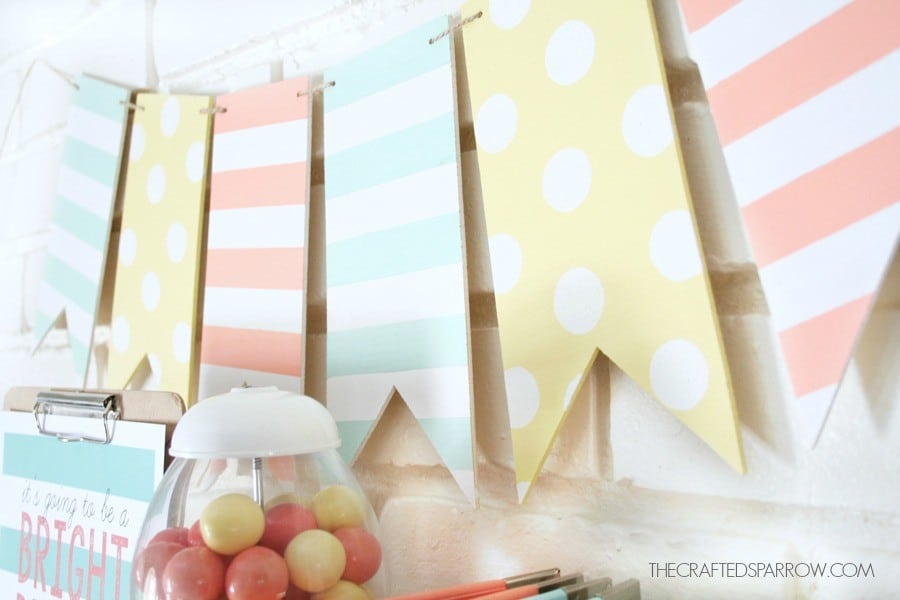
The Crafted Sparrow also has a charming tutorial on how to make a summer wood banner that will add a touch of rustic charm to your home decor!
To make this delightful wood banner, you’ll need just a few materials:
- Wood triangles
- Acrylic paint in various colors
- Paint brushes
- Twine
- Hot glue gun
First, paint each wood triangle with acrylic paint in different summer-inspired colors. You can use any colors you like to match your home decor style.
Next, let the paint dry completely and then use a hot glue gun to attach the wood triangles to a piece of twine. Be sure to space them out evenly to create a balanced look.
Finally, hang your new summer wood banner on a wall or across a mantel to add a touch of rustic charm to your home decor.
Mason Jar Flowers
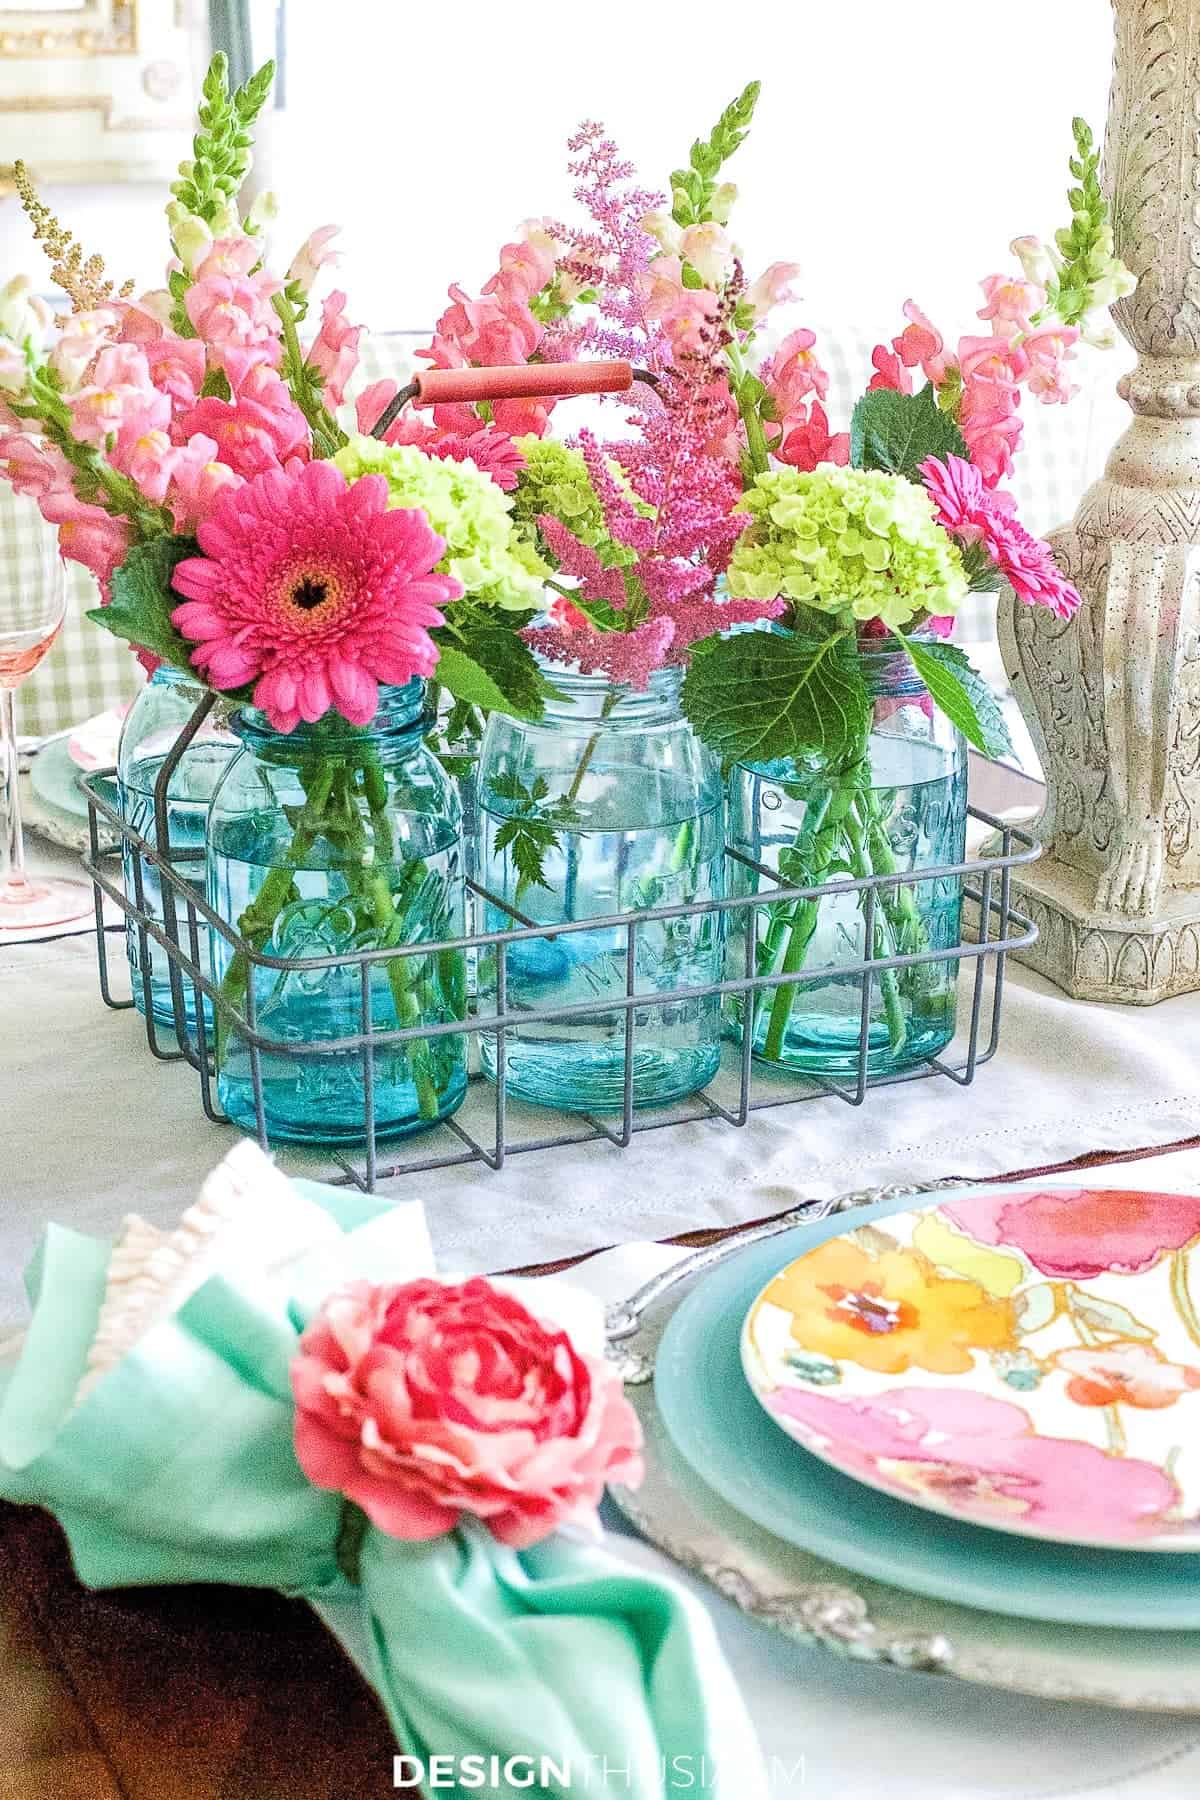
Designthusiasm has a beautiful tutorial on how to create a summer flowers tablescape that will add a touch of elegance to your dining room!
To make this stunning tablescape, you’ll need just a few materials:
- Flowers in various colors and sizes
- Vases in various sizes and styles
- Greenery
- Candles
- Tablecloth or runner
- Dinnerware
- Glassware
First, choose a color scheme for your tablescape and select flowers in various colors and sizes to match. You can use any flowers you like to create a beautiful arrangement.
Next, select vases in various sizes and styles to hold the flowers. You can use clear glass vases or mix and match different styles for a more eclectic look.
Then, add greenery and candles to the tablescape to create a warm and inviting atmosphere. You can use any type of greenery and candles you like to match your personal style.
Finally, set the table with your favorite dinnerware and glassware. You can use a tablecloth or runner to add a pop of color and texture to the tablescape.
DIY Summer Peony Wreath

Tatertots and Jello has a quick and easy tutorial on how to make a 10-minute summer peony wreath that will add a pop of color to your front door!
To make this beautiful wreath, you’ll need just a few materials:
- Grapevine wreath
- Faux peonies in various colors
- Wire cutters
First, use wire cutters to trim the peony stems to the desired length. You can use any colors you like to create a beautiful arrangement.
Next, arrange the peonies on the grapevine wreath, tucking the stems into the vines. Be sure to space them out evenly to create a balanced look.
Finally, hang your new summer peony wreath on your front door to welcome guests to your home.
DIY Summer Candle Art
The Crafted Sparrow has a simple and stylish tutorial on how to make easy summer candle decor that will add a warm and inviting atmosphere to your home!
To make this lovely candle decor, you’ll need just a few materials:
- Glass candle holders
- Sand
- Shells
- Candles
First, fill the bottom of each glass candle holder with a layer of sand. You can use any color of sand you like to match your home decor style.
Next, add a few shells to the sand to create a beachy vibe. You can use any type of shells you like to create a unique arrangement.
Finally, add a candle to each candle holder and light them to create a warm and inviting atmosphere in your home.
DIY Marbled Pots
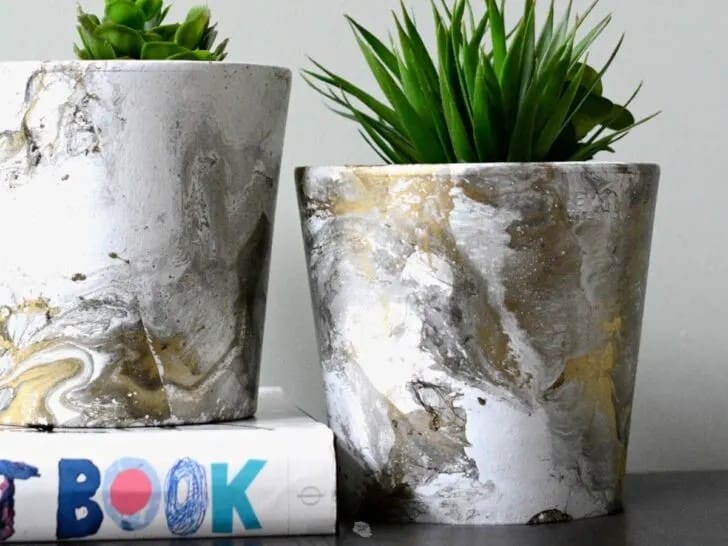
The DIY Nuts has a fun and creative tutorial on how to make DIY marbled pots that will add a unique touch to your home decor!
To make these eye-catching marbled pots, you’ll need just a few materials:
- Terra cotta pots
- Acrylic paint in various colors
- Water
- Toothpick or skewer
First, mix the acrylic paint with water to create a thin, watery consistency. You can use any colors you like to create a unique marbled effect.
Next, pour the paint mixture onto the terra cotta pot and use a toothpick or skewer to swirl the colors together, creating a marbled effect. Be sure to cover the entire pot with the paint mixture.
Finally, let the pot dry completely before planting your favorite flowers or herbs inside.
Repeat these steps for each pot, using different colors to create a beautiful collection.
Summer is the perfect time to let your creativity shine and add some fun and playful decor to your home! With these DIY summer decor projects, you can transform your space into a colorful and inviting oasis that will make you feel like you’re on vacation all season long.
Whether you’re making a summer flowers tablescape, a marbled pot, or a seashell candle, these projects are sure to add a touch of sunshine to your home. So grab your crafting supplies and get ready to have some fun in the sun with these DIY summer decor projects!
